
I have only touched on this feature superficially in previous posts - now to some more detail!
Again, all quotes lifted from the docs are in italics.
Decisions is a very powerful feature in OIC.
Rules can be created within OIC Process applications, and are easily leveraged within your processes,
via the Decision Activity.

Not only that, Decisions can operate standalone; you can expose your Decision Model as a REST service to the outside world. Ergo, you can leverage rules from OIC Integrations, Visual Builder or any REST aware 3rd party app.
So let's begin...

Again - the business value add -
Decision Models allow you to automate the decision logic inherent in your business processes.
These models adhere to the DMN standard 1.1.and are FEEL aware - Friendly Enough Expression Language.This makes it easier for you to define your rules.
So now to some simple examples - as you can see Decisions can be of different types.


Before I start with the ubiquitous Decision Table, how about looking at what else is on offer?
Expressions - here's where you can use FEEL to create logic that evaluates to a single value.
You can check out the FEEL documentation here

Here's an example - checking someone's age -
Note: I have defined age(Number) as input data.


I can now test this simple expression -


I now test with 17 -


self explanatory!

Just a quick remark on the Question / Allowed Answers fields above.
These are, currently, purely documentary.


I have created 2 input items (see on the left)
- countOfOrderItems
- price
See above how I can leverage these in the DT.
I can easily add an extra column for price.

I can then build out the conditions -

Easy to add more rows -

The finished DT -

I can then test this -


Now I expose this as a Service -


I then drag and drop the following -

I click on the Payload menu option -

I see the Endpoint etc. -

Test in Postman -

The Response -


I create a BusinessObject (Order) and a WebForm -

I now leverage the Decision Model -


Next step is to create the Process -
I use the following template -


I amend as follows -

Automatically set -

I complete the data associations for Input/Output


Note: I specified Number as the return type when defining the decision table.
This results in a double being returned by the Decisions Engine.
Activate and Test the process -

I then log in to Workspace as the Approver and see the discount -

Now let's play around with the DT configuration -

F(First)
The First hit policy is used when multiple rules can match the input.
The first hit by rule order is returned.
Note: this makes one totally dependent on the order of the rules - so one needs to be sure
one designs accordingly.

I have added a new rule (line 5).
I then update the definition in my process -


The 16% rule is still applied, because I selected "F".


C+
The Collect with sum hit policy is used when multiple rules can match the input, and the sum of the output values for all the matching rules is desired

Testing...


As you can see, the discount applied is 41% (25 + 16).
C>
The Collect with max hit policy is used when multiple rules can match the input, and the largest output value for all matching rules is desired
I apply this and re-test with the same payload -

Well 25 is larger than 16.
The other Hit Policies are -
A(ny)
Here n+ rules can fire. However, all of these rules must deliver the same output.
If multiple rules are fired generating different results, then hit policy is violated.
A simple example, I change the Hit Policy to A -

It highlights rules 4 and 5 as being conflicting -

I now change the output of rule 4 to 25 -
No more error/warning message -

C>
The Collect with min hit policy is used when multiple rules can match the input, and the smallest output value for all matching rules is desired.
Simple example -
I test with an order for 12 items and a total price of 1234.
This satisfies rules 4 and 5.
The lower value is returned -


C#
The Collect with count hit policy is used when multiple rules can match the input, and the count of the matching rules is desired.
Again a simple example with the same payload as previously used. Remember, 2 rules will be satisfied.


You can also leverage complex types in Decision Tables -


This type definition can then be leveraged, when defining input data -

which can be then used in the DT -


Consult the OIC Process doc here for more detail.
And finally...
You can add Annotations to your DT -


Again, all quotes lifted from the docs are in italics.
Decisions is a very powerful feature in OIC.
Rules can be created within OIC Process applications, and are easily leveraged within your processes,
via the Decision Activity.

Not only that, Decisions can operate standalone; you can expose your Decision Model as a REST service to the outside world. Ergo, you can leverage rules from OIC Integrations, Visual Builder or any REST aware 3rd party app.
So let's begin...

Again - the business value add -
Decision Models allow you to automate the decision logic inherent in your business processes.
These models adhere to the DMN standard 1.1.and are FEEL aware - Friendly Enough Expression Language.This makes it easier for you to define your rules.
So now to some simple examples - as you can see Decisions can be of different types.


Before I start with the ubiquitous Decision Table, how about looking at what else is on offer?
Expressions
Expressions - here's where you can use FEEL to create logic that evaluates to a single value.
You can check out the FEEL documentation here

Here's an example - checking someone's age -
Note: I have defined age(Number) as input data.


I can now test this simple expression -


I now test with 17 -

IF THEN - ELSE

self explanatory!
Decision Tables
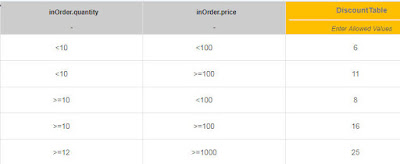
Here I leverage a decision table to compute discount levels.
Discount is based on number of products ordered and total order price.

Just a quick remark on the Question / Allowed Answers fields above.
These are, currently, purely documentary.


I have created 2 input items (see on the left)
- countOfOrderItems
- price
See above how I can leverage these in the DT.
I can easily add an extra column for price.
I can then build out the conditions -

Easy to add more rows -

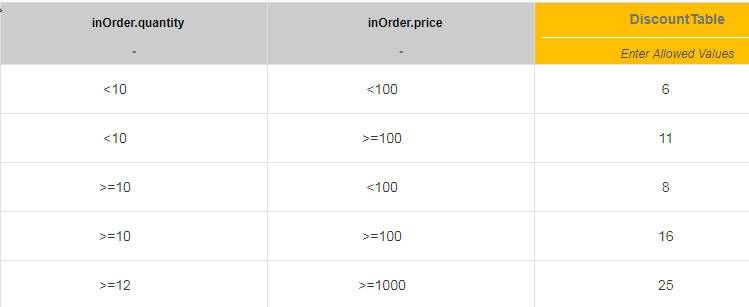
The finished DT -

I can then test this -


Now I expose this as a Service -


I then drag and drop the following -

I click on the Payload menu option -

I see the Endpoint etc. -

Test in Postman -

The Response -

Leverage from a Process
first activate -


I create a BusinessObject (Order) and a WebForm -

I now leverage the Decision Model -


Next step is to create the Process -
I use the following template -


I amend as follows -

Automatically set -

I complete the data associations for Input/Output


Note: I specified Number as the return type when defining the decision table.
This results in a double being returned by the Decisions Engine.
Activate and Test the process -

I then log in to Workspace as the Approver and see the discount -

Now let's play around with the DT configuration -

The Decision Table Hit Policy
F(First)
The First hit policy is used when multiple rules can match the input.
The first hit by rule order is returned.
Note: this makes one totally dependent on the order of the rules - so one needs to be sure
one designs accordingly.

I have added a new rule (line 5).
I then update the definition in my process -


The 16% rule is still applied, because I selected "F".


C+
The Collect with sum hit policy is used when multiple rules can match the input, and the sum of the output values for all the matching rules is desired

Testing...


As you can see, the discount applied is 41% (25 + 16).
C>
The Collect with max hit policy is used when multiple rules can match the input, and the largest output value for all matching rules is desired
I apply this and re-test with the same payload -

Well 25 is larger than 16.
The other Hit Policies are -
A(ny)
Here n+ rules can fire. However, all of these rules must deliver the same output.
If multiple rules are fired generating different results, then hit policy is violated.
A simple example, I change the Hit Policy to A -

It highlights rules 4 and 5 as being conflicting -

I now change the output of rule 4 to 25 -
No more error/warning message -

C>
The Collect with min hit policy is used when multiple rules can match the input, and the smallest output value for all matching rules is desired.
Simple example -
I test with an order for 12 items and a total price of 1234.
This satisfies rules 4 and 5.
The lower value is returned -

C#
The Collect with count hit policy is used when multiple rules can match the input, and the count of the matching rules is desired.
Again a simple example with the same payload as previously used. Remember, 2 rules will be satisfied.


Complex Types in Decision Tables
You can also leverage complex types in Decision Tables -


This type definition can then be leveraged, when defining input data -

which can be then used in the DT -

Built-in Functions
FEEL includes a library of built-in functions that you can use to define expressions.
Process supports the following types of built-in functions:
• Conversion Functions
• Boolean Functions
• String Functions
• List Functions
• Numeric Functions


Consult the OIC Process doc here for more detail.
Annotations
And finally...
You can add Annotations to your DT -


No comments:
Post a Comment