Thursday, May 27, 2010

ADF Taskflow example

This simple lab will demonstrate use of all ADF Task flow components.

It uses SCOTT’s EMP table and the simple onboarding scenario we will implement is as follows –
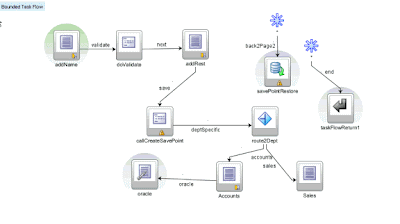


addName
o Here the user can enter empno and ename values.

validateEmployee
o Method call to validate the Ename entered.

addRest
o Here the user can enter the other remaining EMP attribute values.

createSavePoint
o save the state after entering all details, just in case we need to restore it later.

route2Dept
o Routes to department specific page based on –
§ Deptno = 10 --> Accounts
§ Deptno = 20 --> Sales

accounts
o Allows user to change Salary value, and also to revert to the original state (does a SavePoint restore and returns to the page addRest)

sales
o Allows user to change Salary value, and also to revert to the original state (does a SavePoint restore and returns to the page addRest)

This bounded taskflow will be called by our main taskflow as follows –


Create the Employee Task flow

Pre-requisite – Create a Fusion ADF App and create ADF BCs for SCOTT’s EMP and Dept tables.


Step 1 – Create addName page

Drop the following onto your taskflow


addName: create the page, do not create a new managed bean.

Drop EmpView as an ADF Form...


Step 2 – Create the method call


Rename to validateEmployee
Then double-click to create a managed bean –
o Set scope to pageFlow
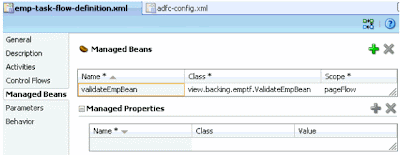


Add the following method to the bean

public String validateEmp() {
// Add event code here...
System.out.println("Employee is valid");
return "valid";
}


Add a Navigation Case – „validate
Set action property of button on addName.jspx to validate

Step 3 – Create the addRest page
· Drop EmpView as an ADF Form...
o Select remaining attributes
o Set action property of button to return

Now we can test this out.

Step 4 – Testing the basic taskflow

This bounded task flow will be called from our adfc-config.xml

· Add a view to adfc-config.xml
· Drop and drop the emp taskflow onto adfc-config.xml


Create the start page
Drag & Drop the EmpView CreateInsert operation as an ADF Button.
Set Button action property to create
Test by running start

Step 5 – Adding a Savepoint
After addRest.jspx we will add a savepoint to save state. In accounts.jspx and sales.jspx the user will have the opportunity to change employee data. If they mess up they would like to be able to revert to the previous state entered in addRest.jspx.

Savepoint saves the data to the DB so we must specific which datasource to use –

java:comp/env/jdbc/scottDS

Add this to your adf-config.xml file.


Create the following method in a new managed bean (CreateSavePointBean with scope=pageflow).


package view.backing.emptf;

import java.io.Serializable;
import oracle.adf.controller.ControllerContext;
import oracle.adf.controller.savepoint.SavePointManager;

public class CreateSavePointBean implements Serializable {
String id = null;

public CreateSavePointBean() {
}


public String createSavepoint() {
ControllerContext cc = ControllerContext.getInstance();
if (cc != null) {
SavePointManager mgr = cc.getSavePointManager();
if (mgr != null) {
setId(mgr.createSavePoint());
System.out.println("Save point is being set " + id);
}
}
return "deptSpecific";
}


public void setId(String id) {
this.id = id;
}

public String getId() {
return id;
}
}


Step 6 – Adding the accounts and sales pages

The logic here is if deptno = 10 then pass control on to the accounts page, if deptno = 20 then go to the sales page. Here the user can change the salary value.

Create the 2 pages accounts and sales and drop the EmpView as an ADF Form.. only include the empno, ename, sal attributes. Also include a Submit button. Set the submit button action property to return.


Step 7 – Adding the router
· Drag & Drop a Router onto the page – rename to route2Dept.


Add a new case
o #{data.view_addRestPageDef.Deptno.inputValue == "10"}
o outcome=accounts

Add a second case
o #{data.view_addRestPageDef.Deptno.inputValue == "20"}
o outcome=sales

Set the default outcome to sales


· Amend createSavePoint and set Fixed Outcome to deptSpecific
· Re-Test

Step 7 – Adding the SavePoint restore
The user can amend the salary in the accounts and sales pages. We will now give them the chance to revert to the original value and return to the addRest page.

· Drag & drop a SavePointRestore onto the diagram


Create a wildcard control flow


Drop a Command Button on the accounts and sales pages –
o set action to back2page2
o set text to Restore Original

Re-Test

Source available at
http://docs.google.com/leaf?id=0B7YrnfO7h717YWIwZjg1Y2EtYzI5Ny00Mjc5LTllODctNTY1MGZkNWEyOTc4&hl=en

Monday, May 24, 2010

JSF 2.0?

Interested in what's on the way?
Then I suggest you look at
http://java.sun.com/javaee/javaserverfaces/ for a good introduction to what's coming.

Composite components is a very interesting feature - good example at Arun Gupta's blog

http://blogs.sun.com/arungupta/entry/totd_135_jsf2_custom_components

As Arun mentions in his blog -

"Essentially, a composite component is what it says - a composition of two or more components such that it behaves like a single component. For example, consider four components in a panel grid where 2 components are "h:outputText" to display prompts and other 2 are "h:inputText" to receive input from the user. The composite components allow all of these components (1 panel grid + 2 "h:inputText" + 2 "h:outputText") packaged as a single component."

He also mentions 2 more features on the way -
Resource Handling and Facelets.

"The Resource Handling defines a standard location for bundling resources in a web application and Facelets defines a cleaner templating language that enables composition."

I'll check these things out and see what the real deltas compared to the current release of ADF Faces from a functional perspective.

Tuesday, May 18, 2010

Testing ADF BC in South Africa

Doing a workshop here, attendees do a vanilla install of Jdev.
Issue running the ADF BC Tester.

Solution: Project Properties --> Run/Debug/Profile --> Edit Default configuration.
Add Java option -Duser.timezone="+2.00"

Seems the guys here are used to this.

Also robot is the South Africa for traffic light e.g. turn left at the next robot.

Great world we live in!

Tuesday, May 11, 2010

Oracle BPM 11g - leveraging web services / parallel paths

In this simple scenario we augment the functionality from the previous post with the following –

Leverage web services to
o Validate Customer
o Check Inventory

This can be done in parallel, so let's implement it!


Create demo web service

See Appendix A for Java class which you can deploy as a web service to the AdminServer.


Test the web services from WLS console


Copy the wsdl
o E.g. http://1.1.1.1:7001/BPM-DEMO-WS-BPM-DEMO-WS-context-root/OrderServicePort?WSDL

Drag & drop a Web Service in composite.xml


Create variables to hold the operation responses


Create Check Inventory ServiceTask


Create validateCustomer Service task


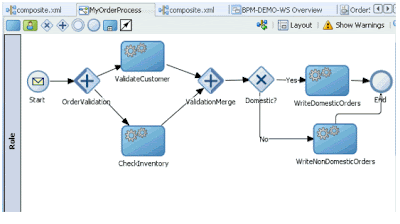
Add parallel processing


Connect as follows –


Deploy & Test
Non-domestic


View instance tracking in em console


Zoom in to ValidateCustomer


I will implement the required error handling in the next post

Appendix A


Deploy as a J2EE 1.5 web service with annotations

Getting starting with Oracle BPM 11g - Adapters Simple example

In this simple scenario we will read in an order via the FileAdapter. This order will be processed and, if approved, saved to file (non-domestic orders) or written to the Orders DB(domestic orders).


Steps
Create 2 directories on your file system (in & out) e.g.


Create a new BPM Application/Project


Define the File Adapter (Read)

Create File Adapter (Read) in composite.xml
Point to the input directory you created.
Poll every 5 seconds for docs of type *.xml

Set type to InOrder as defined in myOrder.xsd at Appendix A.


Define the File Adapter (Write)

Create File Adapter (Write) in composite.xml
Point to the output directory you created.
Set type to OutOrder as defined in myOrder.xsd at Appendix A.


Define the Database Adapter

Use Orders table defined at Appendix B.


select all columns


Leverage the Adapter Services in BPM

Back in the BPM Project navigator –


Create a Project Data Object for the incoming order


Edit the Start activity to leverage the file adapter (read) service


Delete the UserTask. We will add it again later, now we just want to test the adapters.
Drop a Service onto the page.


Create a second service task


Add Exclusive Gateway


Set Condition for Domestic.


Deploy & Test

Ensure you have set up the required DB artifacts on WLS before testing.
- In WLS Console -
-- Define a Datasource e.g. jdbc/scott
-- Target to soa_server1
-- Define a new connection pool (Deployments --> DBAdapter --> New)
--- Configuration --> New -->Outbound connection Pools
---- enter name you used when defining the DB adapter in your project e.g. eis/DB/scott

---- Edit the new connection pool and set xaDataSourceName to jdbc/scott

Back to the Deployments list -
Select DB Adapter --> then press Update


Test using xml payloads at Appendix C.
Non-Domestic orders written to the \out directory


Appendix A XSD


Appendix B Database Table SQL

CREATE TABLE ORDERS
(
ORDER_NR VARCHAR2(20 BYTE) NOT NULL
, CUSTOMER VARCHAR2(50 BYTE) NOT NULL
, EMAILADDR VARCHAR2(50 BYTE) NOT NULL
, COUNTRY VARCHAR2(50 BYTE) NOT NULL
, PHONE VARCHAR2(50 BYTE) NOT NULL
, PRODUCT VARCHAR2(50 BYTE) NOT NULL
, QUANTITY NUMBER(10, 0) NOT NULL
, UNITPRICE NUMBER(10, 2)
, SUPPLIER VARCHAR2(50 BYTE)
, TOTALPRICE NUMBER(10, 2)
, ORDERSTATUS VARCHAR2(50 BYTE)
, COMMENTS VARCHAR2(256 BYTE)
, CONSTRAINT SYS_C005116 PRIMARY KEY
(
ORDER_NR
)
ENABLE
)
;

Appendix C - Test Payload