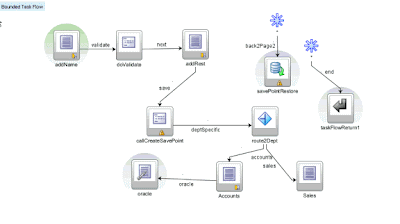
It uses SCOTT’s EMP table and the simple onboarding scenario we will implement is as follows –

addName
o Here the user can enter empno and ename values.
validateEmployee
o Method call to validate the Ename entered.
addRest
o Here the user can enter the other remaining EMP attribute values.
createSavePoint
o save the state after entering all details, just in case we need to restore it later.
route2Dept
o Routes to department specific page based on –
§ Deptno = 10 --> Accounts
§ Deptno = 20 --> Sales
accounts
o Allows user to change Salary value, and also to revert to the original state (does a SavePoint restore and returns to the page addRest)
sales
o Allows user to change Salary value, and also to revert to the original state (does a SavePoint restore and returns to the page addRest)
This bounded taskflow will be called by our main taskflow as follows –

Create the Employee Task flow
Pre-requisite – Create a Fusion ADF App and create ADF BCs for SCOTT’s EMP and Dept tables.


Step 1 – Create addName page
Drop the following onto your taskflow

addName: create the page, do not create a new managed bean.
Drop EmpView as an ADF Form...


Step 2 – Create the method call

Rename to validateEmployee
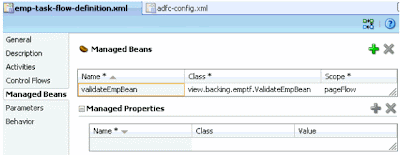
Then double-click to create a managed bean –
o Set scope to pageFlow

Add the following method to the bean
public String validateEmp() {
// Add event code here...
System.out.println("Employee is valid");
return "valid";
}
Add a Navigation Case – „validate“
Set action property of button on addName.jspx to validate
Step 3 – Create the addRest page
· Drop EmpView as an ADF Form...
o Select remaining attributes
o Set action property of button to return
Now we can test this out.
Step 4 – Testing the basic taskflow
This bounded task flow will be called from our adfc-config.xml
· Add a view to adfc-config.xml
· Drop and drop the emp taskflow onto adfc-config.xml

Create the start page
Drag & Drop the EmpView CreateInsert operation as an ADF Button.
Set Button action property to create
Test by running start
Step 5 – Adding a Savepoint
After addRest.jspx we will add a savepoint to save state. In accounts.jspx and sales.jspx the user will have the opportunity to change employee data. If they mess up they would like to be able to revert to the previous state entered in addRest.jspx.
Savepoint saves the data to the DB so we must specific which datasource to use –
Add this to your adf-config.xml file.

Create the following method in a new managed bean (CreateSavePointBean with scope=pageflow).

package view.backing.emptf;
import java.io.Serializable;
import oracle.adf.controller.ControllerContext;
import oracle.adf.controller.savepoint.SavePointManager;
public class CreateSavePointBean implements Serializable {
String id = null;
public CreateSavePointBean() {
}
public String createSavepoint() {
ControllerContext cc = ControllerContext.getInstance();
if (cc != null) {
SavePointManager mgr = cc.getSavePointManager();
if (mgr != null) {
setId(mgr.createSavePoint());
System.out.println("Save point is being set " + id);
}
}
return "deptSpecific";
}
public void setId(String id) {
this.id = id;
}
public String getId() {
return id;
}
}


Step 6 – Adding the accounts and sales pages
The logic here is if deptno = 10 then pass control on to the accounts page, if deptno = 20 then go to the sales page. Here the user can change the salary value.
Create the 2 pages accounts and sales and drop the EmpView as an ADF Form.. only include the empno, ename, sal attributes. Also include a Submit button. Set the submit button action property to return.


Step 7 – Adding the router
· Drag & Drop a Router onto the page – rename to route2Dept.

Add a new case
o #{data.view_addRestPageDef.Deptno.inputValue == "10"}
o outcome=accounts
Add a second case
o #{data.view_addRestPageDef.Deptno.inputValue == "20"}
o outcome=sales
Set the default outcome to sales

· Amend createSavePoint and set Fixed Outcome to deptSpecific
· Re-Test
Step 7 – Adding the SavePoint restore
The user can amend the salary in the accounts and sales pages. We will now give them the chance to revert to the original value and return to the addRest page.
· Drag & drop a SavePointRestore onto the diagram


Create a wildcard control flow

Drop a Command Button on the accounts and sales pages –
o set action to back2page2
o set text to Restore Original
Re-Test
Source available at
http://docs.google.com/leaf?id=0B7YrnfO7h717YWIwZjg1Y2EtYzI5Ny00Mjc5LTllODctNTY1MGZkNWEyOTc4&hl=en


No comments:
Post a Comment