Showing posts with label OCI AI Vision. Show all posts

Wednesday, May 28, 2025

#1071 OIC invoking OCI AI Vision Service


Introduction

Yet another post in the OIC for OCI AI Services series. Today we're looking at AI Vision service. Firstly, what does this service offer?

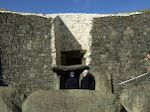
Why begin with a picture of McSorleys? Because, we'll use this image in some of the following invokes to OCI AI Vision service.

What does AI Vision offer?


You can check out the OCI AI Vision home page here

Net, net the service offers the following -
  • Image Classification
  • Text Detection
  • Face Detection
  • Object Detection
  • Video Analysis

Let's look at the basic 3 steps when using AI Vision -

  • Ingesting data - e.g. images from object storage or anywhere. You can use OIC to pull in data from anywhere. We ship with the native action for OCI Object Storage as well as a plethora of adapters.
  • Understanding data - here's where AI Vision does it's magic, recognising images, parsing text etc. OIC can easily invoke AI Vision, this is what we'll cover today
  • Using the Intel - here we take the result(s) from AI Vision and use them in our business processes. OIC is THE business process automation toolkit, so let's kick the tyres!

OCI AI Vision 

Here is the Vision menu in OCI. 

Object Detection

This feature allows one to identify objects and their location within an image along with a confidence score.

I try it out - 

Now with a picture with more action in it - 

Yes, the above screenshot does not include the confidence values.

But you get the idea. I want to know what's going on in the image, AI Vision tells me that, assigning a degree of confidence to what it finds.

So how can we do this in OIC?

First thing I do is check out the python code - 

Now to the api docs for OCI AI Vision, here I find the API endpoints -

I'm in PX, so I will use - 

https://vision.aiservice.us-phoenix-1.oci.oraclecloud.com

 Now to the api for object detection -

post /20220125/actions/analyzeImage

The complete url -https://vision.aiservice.us-phoenix-1.oci.oraclecloud.com/20220125/actions/analyzeImage

Request Payload - the basic input here is the image for analysis.

Let's just go with OBJECT_DETECTION here.

The final request payload is as follows  

{
  "features": [
    {
      "featureType": "OBJECT_DETECTION"
    }
  ],
  "image": {
    "source": "INLINE",
    "data": "base64"
  },
  "compartmentId": "yourCompartment_ocid}}"
}

The response payload is as follows  -

{
  "imageObjects": [{
    "name": "Person",
    "confidence": 0.98758954,
    "boundingPolygon": {
      "normalizedVertices": [{
        "x": 0.6116622686386108,
        "y": 0.584307074546814
      }, {
        "x": 0.6986929178237915,
        "y": 0.584307074546814
      }, {
        "x": 0.6986929178237915,
        "y": 0.9633761644363403
      }, {
        "x": 0.6116622686386108,
        "y": 0.9633761644363403
      }]
    }
  }, {
    "name": "Chair",
    "confidence": 0.984481,
    "boundingPolygon": {
      "normalizedVertices": [{
        "x": 0.2508918046951294,
        "y": 0.7415730953216553
      }, {
        "x": 0.32072916626930237,
        "y": 0.7415730953216553
      }, {
        "x": 0.32072916626930237,
        "y": 0.9100103378295898
      }, {
        "x": 0.2508918046951294,
        "y": 0.9100103378295898
      }]
    }
  }, {
    "name": "Footwear",
    "confidence": 0.9828044,
    "boundingPolygon": {
      "normalizedVertices": [{
        "x": 0.5381702184677124,
        "y": 0.9290227890014648
      }, {
        "x": 0.5808274149894714,
        "y": 0.9290227890014648
      }, {
        "x": 0.5808274149894714,
        "y": 0.9576336741447449
      }, {
        "x": 0.5381702184677124,
        "y": 0.9576336741447449
      }]
    }
  }, {
    "name": "Person",
    "confidence": 0.9810399,
    "boundingPolygon": {
      "normalizedVertices": [{
        "x": 0.5125582814216614,
        "y": 0.5717782378196716
      }, {
        "x": 0.5918540954589844,
        "y": 0.5717782378196716
      }, {
        "x": 0.5918540954589844,
        "y": 0.9574788808822632
      }, {
        "x": 0.5125582814216614,
        "y": 0.9574788808822632
      }]
    }
  }, {
    "name": "Footwear",
    "confidence": 0.97873676,
    "boundingPolygon": {
      "normalizedVertices": [{
        "x": 0.5209354758262634,
        "y": 0.9121176600456238
      }, {
        "x": 0.5540853142738342,
        "y": 0.9121176600456238
      }, {
        "x": 0.5540853142738342,
        "y": 0.9327118396759033
      }, {
        "x": 0.5209354758262634,
        "y": 0.9327118396759033
      }]
    }
  }],
  "labels": null,
  "ontologyClasses": [{
    "name": "Chair",
    "parentNames": ["Furniture"],
    "synonymNames": []
  }, {
    "name": "Footwear",
    "parentNames": ["Clothing"],
    "synonymNames": []
  }, {
    "name": "Person",
    "parentNames": [],
    "synonymNames": []
  }, {
    "name": "Clothing",
    "parentNames": [],
    "synonymNames": []
  }, {
    "name": "Furniture",
    "parentNames": [],
    "synonymNames": []
  }],
  "imageText": null,
  "objectProposals": null,
  "detectedFaces": null,
  "detectedLicensePlates": null,
  "imageClassificationModelVersion": null,
  "objectDetectionModelVersion": "2.0.3",
  "textDetectionModelVersion": null,
  "objectProposalModelVersion": null,
  "faceDetectionModelVersion": null,
  "licensePlateDetectionModelVersion": null,
  "errors": []
}

I create the connection in OIC -

then on to the integration -

The AI Vision Invoke is configured as follows -

You've already seen the request and response payloads, so I'll skip them.

I only want to return a precis of the AI Vision response, so my trigger response has been defined as follows - 

{{
 "imageObjects" : [ {
    "name" : "Person",
    "confidence" : 0.98758954
  }, {
    "name" : "Chair",
    "confidence" : 0.984481
  } ],
  "ontologyClasses" : [ {
    "name" : "Chair",
    "parentNames" : [ "Furniture" ]
  }, {
    "name" : "Footwear",
    "parentNames" : [ "Clothing" ]
  } ]
}
 
I complete the mapping and test - 

Regarding the image I used -

Mc Sorley's is an institution in New York, the oldest pub in the city, in the hands of the Irish up til this very day. They only serve 2 types of beer, a dark beer, which is rather unpalatable and a lager, which is to everyone's taste. The beer is served in very small glasses, ergo, you don't order 1 you order 4 and if you're with me and the bauld Peter Meleady, 24.     

Image Classification

according to the docs - Image classification assigns classes and confidence scores based on the scene and contents of an image

So this is a subtle difference to the OBJECT_DETECTION feature, detailed above.

The tailored response to this api invoke is as follows - 

This invoke, as expected, does not return any X, Y co-ordinates.

Face Detection

As the name suggests, detects faces and their X, Y positions in the image.

Text Detection

Let's try this out in OCI - 

Looks good! Now to OIC -


Just to note here, we need to set the featureType=TEXT_DETECTION

Here's the Request payload for the api invoke -

{
  "features": [
    {
      "featureType": "TEXT_DETECTION"
    }
  ],
  "image": {
    "source": "INLINE",
    "data": "base64"
  },
  "compartmentId": "yourCompartment_ocid}}"
}
 
The Response payload I initially set to {}. I then run the integration in Debug mode, then copy and paste the json response shown in the activity stream.


I configure the REST trigger to return only a subset of this data -

Video Analysis 


The video analysis includes - 

  • Label Detection
  • Object Detection
  • Text Detection
  • Face Detection

Summa Summarum

AI Vision is yet another cool AI service in the OCI stack. This post is just an introduction to the service, but I hope it has whetted your appetite!

Bon appetit!


Friday, July 1, 2022

#914 - OIC - End to End Business Process Automation

Introduction

I introduced this topic in a previous post, but now to a concrete application of what was discussed. Here we have a scenario of documents being uploaded in a content management system. These documents could be purchase orders, invoices etc. and they need to be processed automatically, as much as possible. This post details how such could be implemented with OIC. I have added an extra step for human approvals, as this is often the case; there always are occasions where some documents need to be validated before further processing can take place. The graphic below illustrates the demo flow I have created. Documents are uploaded to a CMS. An OIC integration can be triggered each time a document is created, or else we could have an OIC scheduled job polling the CMS on a regular basis for new files.


The OIC integration passes the document to OCI AI-Vision. The latter parses the document, returning document type, key values etc. In my case, all invoices need to be approved by finance before being created in Netsuite. In my example I only implement the Invoice "route", but I'm sure we can all extrapolate from that. 

CMS

As in the previous post, I am using OCI Object Storage as my "CMS". Naturally, in the real world, you would be using a proper CMS such as Oracle Content Management. Object Storage can emit an event - new object created - and this event can raise an OCI Notification, which results in an OIC integration being triggered. As mentioned above, OIC could also poll the CMS for new documents on a regular basis. The mechanics of setting up Object Storage -> Events Service -> Notification Service-> OIC are discussed in the previous post on this topic. 

OCI AI Vision

OCI AI Vision Service has also been discussed in the previous post on this topic. Net, net, the service has a rich REST api you can leverage to analyze documents. Here is an example with my sample invoice.  

First the invoice - 


then the analysis -


The Response json is worth reviewing as this is what needs to be parsed in the OIC Integration.


OIC Integration

The main integration can be implemented as an app driven or scheduled orchestration - in my case, app driven. I create a REST connection to OCI Object Storage and use this to retrieve the document(s) - 


Next step, as you can see, is to invoke OCI AI Vision via an OIC REST connection to analyze the document. 

I implement a SWITCH action to parse the result from OCI AI Vision -


Above, is the Invoice path. The For Each loops are used to extract the result - key fields etc.   
Finally, I invoke the OIC Process - Approve Invoices.


OIC Process


I can easily add documents to the Process - in other words, OIC integration can invoke the process and add the original invoice to the Process documents folder -  


So let's test!

Test


I upload an invoice to my "CMS" -


The Integration is triggered and returns - 


I check my OIC Process Tasklist - 


The form shown above is the generated default, naturally, this can be prettified. Again, the original invoice image can be attached to this process instance as a document, if required.


Summary

The rich toolkit that is OIC, together with the power of OCI Services, enables one to easily automate  End to End Business Processes. The combination of capabilities that OIC provides 
- app integration
- process automation
- out-of-the-box business user facing dashboards with Insight
- low code app native mobile and web development with Visual Builder
- trading partner management with B2B

is unique, and, when one combines this with the rich set of OCI services, the results are unbeatable.