Friday, November 27, 2015
Tuesday, November 24, 2015
#456 Oracle BAM for right time operational intelligence
The release of SOA Suite 12.2.1 is a good time to revisit BAM.
You can use the tool to analyze data
- before,
- during
- and after business events.
BAM 12.2.1. in a major development of BAM 12.1.3 as is really worth look at.
In this introductory post I discuss the architecture and detail a simple example.

Before we get into the tool itself, I strongly suggest you look at the BAM Users Guide.


Let's create one, but first I need a project -


Now what is this Create BPM Example ?
This essentially creates a project with data objects for Oracle Business
Process Management (BPM) processes. An example in a later post!

Note: we have pre-seeded data objects -

Note: Twenty seven ready-to-use fact and dimension physical data objects and logical
data objects created as part of BPM, SOA, and BAM installation.
These can be added to the project, if required. Or else, I can create a new one.
Now the creation of data objects is done by the Administrator, the idea being
that a data object can be used in one or more projects.
So we already have our project - let's create the data object -
I click on the Administrator tab.


I add the following columns -

I add some data via the Data link -


Now I go back to the Designer and add this Data Object to the project.


Here is the query result -

Now I want to visualize this -


Check out the Properties -

Check out the Runtime-Interaction -

Here we have the ability to turn this "static" query into a continuous query, thus providing
a self-updating business view. More about that in a later post.
Now I want to use this Business View in a Dashboard -

I add my Supplier View -

I add a couple of more rows to the data object -


You can use the tool to analyze data
- before,
- during
- and after business events.
BAM 12.2.1. in a major development of BAM 12.1.3 as is really worth look at.
In this introductory post I discuss the architecture and detail a simple example.
BAM Architecture and Concepts

Before we get into the tool itself, I strongly suggest you look at the BAM Users Guide.
Chapter 1 - Understanding BAM - is well worth reading. Doc available here
Here is a precis of the Architecture section -
BAM leverages MDS to store artifact metadata - data objects etc.
The Persistence Engine is Coherence based, storing inserts, updates and deletes to data objects.
The Advanced Continuous Query Service(CQS) is essentially BAM's wrapper around the CQL engine (OEP).
When you create a Query in BAM, tables are created in CQS. The CQS listens for data changes in the Persistence Engine and passes them on to the CQL engine for processing. CQS gets the result back and passes it on to the Report Cache.
The Report Cache receives and caches query results and pushes the results on to the Dashboards.
Dashboards provide data visualisation.
The Alert Service validates query results against alert rules. e.g. alert the sales manager on orders over €10000.
Now to the tool itself -
BAM Composer

Designer

Data
To quote the ORCL docs -
Data objects in BAM are based on the process star schema. This is the star schema
standard adapted for use in process analytics. Fact tables contain measures such as process running times, and dimension tables contain dimensions such as process names.
Let's create one, but first I need a project -


Now what is this Create BPM Example ?
This essentially creates a project with data objects for Oracle Business
Process Management (BPM) processes. An example in a later post!

Note: we have pre-seeded data objects -

Note: Twenty seven ready-to-use fact and dimension physical data objects and logical
data objects created as part of BPM, SOA, and BAM installation.
These can be added to the project, if required. Or else, I can create a new one.
that a data object can be used in one or more projects.
So we already have our project - let's create the data object -
I click on the Administrator tab.


I add the following columns -

I add some data via the Data link -


Now I go back to the Designer and add this Data Object to the project.

Business Queries
I add one - for sales by Supplier


Here is the query result -

Now I want to visualize this -
Business Views


Check out the Properties -

Check out the Runtime-Interaction -

Here we have the ability to turn this "static" query into a continuous query, thus providing
a self-updating business view. More about that in a later post.
Now I want to use this Business View in a Dashboard -

I add my Supplier View -

I add a couple of more rows to the data object -


Wednesday, November 18, 2015
#455 PCS Notifications
Simple example -
A loan request is entered by jcooper, kicking off an approvals process -

jstein, the approver, gets an email -

Here is the email body -

jstein can click on the Workspace application link in the email.


Select Email as Notification Mode.
This should then pre-populate the URL, User and Password fields.
You can then register your own email address - I used my own private GMAIL address.

As the above dialogue says, you then receive an email
from Oracle Cloud asking you to confirm use of this email address -

After you confirm, you will receive another email -

That's it!
Now you can configure Notifications for your human tasks -

A loan request is entered by jcooper, kicking off an approvals process -
jstein, the approver, gets an email -

Here is the email body -

jstein can click on the Workspace application link in the email.


Notification Setup
Login to Workspace as an Admin user - click on Configuration - Settings -

Select Email as Notification Mode.
This should then pre-populate the URL, User and Password fields.
You can then register your own email address - I used my own private GMAIL address.

As the above dialogue says, you then receive an email
from Oracle Cloud asking you to confirm use of this email address -

After you confirm, you will receive another email -
That's it!
Now you can configure Notifications for your human tasks -

Tuesday, November 17, 2015
#454 PCS -> V2 --> What's new - > Docs Integration and other goodies
The latest release of PCS includes deep Doc Cloud integration.
You can read all about it here
There are also some other goodies, that will be highlighted in this post.
Now to my simple example -
The process is very simple -
1. Applicant enters the loan request
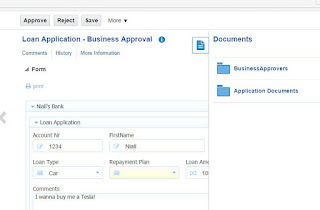
2. Business approver approves the loan from a business perspective.
3. Legal approver approves the loan from a legal perspective.


You can read all about it here
There are also some other goodies, that will be highlighted in this post.
Now to my simple example -
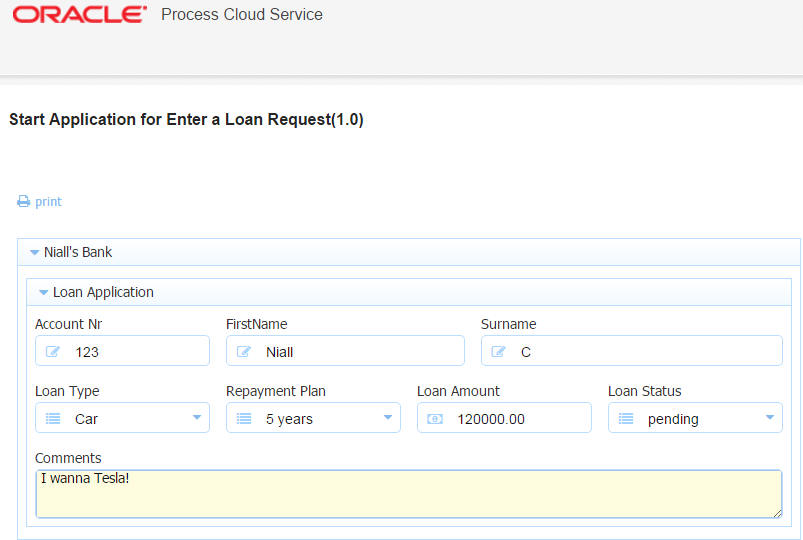
Buy a Tesla
I am applying for a bank loan to buy myself a Tesla.The process is very simple -
1. Applicant enters the loan request
2. Business approver approves the loan from a business perspective.
3. Legal approver approves the loan from a legal perspective.
Why is legal approval required?
Just to illustrate the comprehensive docs integration, nothing more ;--)
So here is the basic XSD -

I will create a business object, based on this.
Create the Application

Let's look at the above, note -
1. The new Documents link, with 1 pre-created artifact (starter folder)
2. More process patterns are now available.
Before we look at the documents, let's create the business object -


Promote to Business Object -

Create the Form based on the BO

Very professional, don't you think?
Configure Documents

The above folder has been auto-created for me.
This is marked as the Startup folder. You can just imagine this folder
could be used by the loan applicant to upload supplementary docs such as proof
of salary etc.
So where is this folder?
Naturally, you need to configure PCS with a Docs connection -
This is done as Admin in workspace.

Ok, I've obfuscated some of the url, not that I don't trust you all.
But you get the general idea.
You have to have a subscription to Docs for this to work.
Now I log in to docs, just to show you, the folder, has not, as yet, been created.

More, later.
Let's now look at the folder properties in PCS composer -

I can change these, if required.
Note, we have a top level folder for the app - EasyMoney4YouApp.
Then each instance of the process will get a sub-folder.
The sub-folder name is composed as follows -
EasyMoney4YouApp_instance.id to ensure uniqueness.
Note: The startup folder becomes available when you start a process.
Let's create a couple of new folders, one for business approvers and one
for legal approvers.

Note the various access types -
- Contributor
- Downloader
- Viewer
- None
These are self-explanatory, don't you think?

Create the Process

To begin with, let's peruse the new patterns now available in PCS -


Every release of PCS is targeted at making it easier to create business processes.
I choose the Form Approval Pattern.
First step is to rename the 2 swimlanes and add a third.

Now, I implement the process -

Note the renamed menu option - Associate the data.
I click on Implement.

Now I click on
Note: the data association has been automatically created for me.

Note: a Task outcome data object has also been auto-created for me.
I implement the business approval task -
I specify the Form to be used and then click the Documents link.

Here I see the 3 folders available -


and I have the opportunity to specify access,
by clicking the Override link.
by clicking the Override link.
This I do -

Makes sense, doesn't it?
Now I implement the rest of the process -

Resubmit is configured as follows -

LegalApproval is configured as follows -

I deploy the app and then I login to Workspace as an admin user, to set the roles -

Testing
Login to Workspace as jcooper.


Notice the docs link on the left of the page -


I will now upload my proof of salary -


I then click Submit, thus kicking off the approvals process.
I log in to Docs and see the folder, EasyMoney4YouApp-1.0, has been created -

I open the folder in Docs -
The instance sub-folder has been created -

I open the sub-folder in Docs -
Here are the 3 folders -

I click on Application Documents -

I now login to Workspace as the Business Approver - jstein.

I open the task and review the docs -
Quelle surprise, I see 2 folders -

I can review the proof of salary doc -

The Approver can open the document in workspace.

He can also upload relevant docs to the Business Approvers folder -


jstein approves and the process continues.
Now the legal eagle logs in -

He sees all 3 folders -

He can view the doc uploaded by John Steinbeck, our business approver -


Very illuminating!
He can also open the content in Docs -


not much functionality available here as I only have Viewer rights.
Now, legal can also upload docs -

Now look what happens when I open this document in Docs -

I have much more functionality available.
Legal also approves and I get my Tesla!
Excellent stuff! don't you think?
Subscribe to:
Posts (Atom)