Step 1 - Deploy axis to OC4J
Step 2 - Use it!
Step 1 - Deploy axis to OC4JI'm using standalone OC4J 10.1.3.3.
Download Apache AXIS from http://ws.apache.org/axis/ (I used the version 1.4)
Unzip to a directory of your choice e.g. D:\axis

Copy the axis sub-directory across to your OC4J installation

Update the OC4J default-web-site.xml file with the following entry -

Update the OC4J application.xml file with the following entry -

Stop/Start OC4J
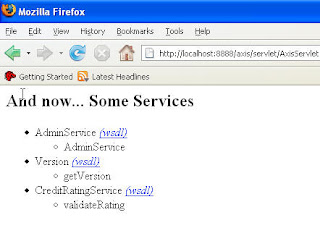
Test by calling the following URL - http://localhost:8888/axis/
Creating a simple JAVA WEB ServiceCreate a simple java class in JDeveloper without a package structure e.g.
public class SayHi2U {
public SayHi2U() {
}
public String sayHi(String name){
return "Hi there " + name;
}
}
Copy the .java file to the axis sub-directory on OC4J
Rename from .java to .jws

Stop/Start OC4J
Test with the URL http://localhost:8888/axis/SayHi2U.jws
Standard Java Web Service DeploymentThe simple java web service deployment, described in the previous section, is very limited. Standard deployment of Java Web Services is as follows –
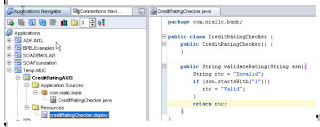
Here we will use the CreditRatingChecker Class defined below
Create the following directory structure under the OC4J\axis sub-directory –

Copy the .class file, CreditRatingChecker.class, to this directory
Create the following file, deploy.wsdd, in the same directory
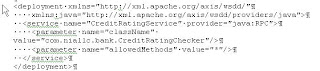
What is a wsdd? - Accroding to the Apache Axis doc -
To really use the flexibility available to you in Axis, you should get familiar with the Axis Web Service Deployment Descriptor (WSDD) format. A deployment descriptor contains a bunch of things you want to "deploy" into Axis - i.e. make available to the Axis engine. The most common thing to deploy is a Web Service...We will use the AXIS admin client to „deploy“ the web service, but firstly we have to set the classpath etc.
Create a .bat file in the same directory with the following –
set AXIS_HOME=D:\AXIS\axis-1_4
set AXIS_LIB=%AXIS_HOME%\lib
set AXISCLASSPATH=%AXIS_LIB%\axis.jar;%AXIS_LIB%\commons-discovery-0.2.jar;%AXIS_LIB%\commons-logging-1.0.4.jar;
set AXISCLASSPATH=%AXISCLASSPATH%;%AXIS_LIB%\jaxrpc.jar;%AXIS_LIB%\saaj.jar;
set AXISCLASSPATH=%AXISCLASSPATH%;%AXIS_LIB%\log4j-1.2.8.jar;%AXIS_LIB%\xml-apis.jar;%AXIS_LIB%\xercesImpl.jar
set classpath=%AXISCLASSPATH%;%classpath%
Open a DOS box in the directoy
Run your .bat file
Then enter the following cmd (-p is the Port directive)
java org.apache.axis.client.AdminClient deploy.wsdd -p 8888
Test